4.0 Equipment Operation
The PWX1 device provides a visual operator interface, does not include touch functionality, and performs interface operations via three buttons, as follows:
- Left/Up Button: navigates to the left control and decreases the value of an option.
- Confirm/Return buttons: Short press to confirm (enter function) / Long press to exit editing and return to upper page.
- Right/Down Button: Navigates to the right control, increasing the value of an option.
4.0.1 Functional classification
4.0.1.0 Standard Features
The PWX1 device provides four main functional interfaces, as shown in the figure below, namely
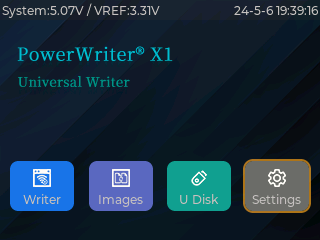
- Offline burn-in: enter the programmer mode, used to control the programming of the target chip to complete the project data.
- Image Replacement: Access to the file manager for replacing the current project file to be programmed.
- USB Flash Drive Mode: Identifies USB-connected USB flash drive devices for loading project files from USB flash drives.
- System Settings: Sets the behavior and preferences of the PWX1.
In addition to the four functional modules, in addition, the status bar will display the current system voltage of the device and the voltage value of VREF in real time, while the right side displays the current system time, which will be used to record the system operation status, programming logs and other information.
4.0.1.1 Special function
PWX1 internal error handling mechanism, some need to be handled by the user error information, in the form of a dialogue box to show to the user to remind the user to rule out and deal with, this kind of interface is triggered in specific circumstances, such as the system voltage is not enough power supply, the status bar system voltage will be displayed in red, the VREF short-circuit will be a pop-up dialogue box and other information.
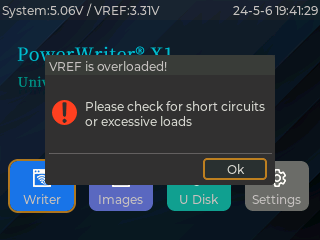
The schematic only demonstrates one of the error messages, due to the error message display content is more, and at any time may be added and adjusted, this does not show one by one, the specific interface display shall prevail.
4.0.2 Offline programming
4.0.2.1 Function
When started by the machine signal CTRL, it will automatically go to the current page and perform the programming operation of the target chip.
The offline burning function of PWX1 is used to realize the programming of the target chip. After moving the cursor to the offline burning button, click the confirmation button to enter the offline burning interface, which is displayed as below:
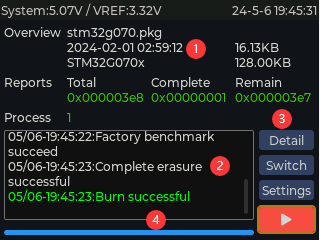
- ① Programming Information: It is used to display the information of the currently loaded project in real time, which mainly contains the following information display.
- Image Overview: Displays the basic information of the current project file, such as the project file name, the creation time of the project, the project file size, the current chip name, the chip Flash size and other information.
- Data Statistics: Statistics of current burn-in information.
- Total: The total number of times the current project has been programmed.
- Burned: the number of times it has been burned.
- Remaining times: how many times are left for the current burn.
- ② programming log: real-time display of the current operation information (including timestamps), operation success is displayed in green, operation failure will be displayed in red, general information is displayed in white or grey (related to the theme, see the system settings, theme settings).
- ③ Function buttons: The function button area provides file information, switching files, system settings, and start (stop) programming.
- File Information: View basic information about the current project file.
- Switch File: Switch the currently burned project file.
- System Settings: Jump to the System Settings page to change the system settings for flexible adjustments during production.
- Start/Stop: Starts programming/ Stops programming.
- ④Programming Progress: Real-time display of the programming progress of the current chip.
- Data display format can be switched between decimal and hexadecimal display through Setup->Data Display. If there is no limit to the number of times the item can be displayed, the data statistics will display "---" instead.
- Start programming and stop programming for the same key, such as turning on the target chip auto-detection function, the first time still need to click on the start button to start.
4.0.2.2 Programming Demo
This section will demonstrate the offline burning function, refer to the following animation demonstration:
The current animation was recorded using the PowerWriter app, and the device was not disconnected during recording, so there is an error indicating that the connection was not disconnected.
4.0.3 File manager
4.0.3.1 Function
System image (file manager) used to manage internal storage and USB device storage media file system, support FAT, FAT32, exFAT and other file system formats, the device factory storage size of 32GB, enough to cope with complex production scenarios, the file manager supports the loading of the project file (pkg), the history of the recovery of such functions.
History Recovery function when reselecting the burned project file a dialogue box appears to ask, is it a brand new load or recovering the previous record, when selecting a brand new load, it is used as a new file, you may need to re-enter the password to confirm it, and the number of times of burning etc. are all counted according to the brand new one, when selecting the recovering, you don't need to enter the password, and the progress of the burning depends on the progress of the burning of the previous burns.
4.0.3.2 Operation Demonstration
When connecting a USB stick, File System Heavy will be able to see the disc letter of the USB stick and can choose to load the project file from the USB stick.
4.0.4 USB flash drive mode
4.0.4.1 Function
When it is necessary to connect the X1's internal storage to the PC file manager, you can start the USB flash drive mode, at this time, the X1 device will be connected to the PC, and the disc symbol will be displayed in the PC's file system, so that you can import files into the disc, as well as export data.
In the file system, system operation records are stored, please do not delete them to avoid loss of record information.
The PowerWriter application will be disconnected when you enter USB memory stick mode and reconnected when you exit USB memory stick mode.
4.0.5 System settings
The following setting functions are included in the system settings:
VREF Voltage:
- Follow Image File (default): This option will determine the VREF's voltage follow project file setting.
- Fixed 1.8V: VREF sets the 1.8V output.
- Fixed 3.3V: VREF sets the 3.3V output.
- Fixed 5V: VREF sets the 5.0V output.
- External input reference: VREF Set to follow target board IO voltage (required)
Buzzer:
- Follow image file (default): the buzzer sound follows the project settings, set to on or off, when the project file is on, the default is a whisper.
- OFF: Turns off the buzzer tone.
- Whisper: On and set to whisper mode.
- Loud: On and set to Loud mode.
Speed:
- Follow image File (default): The programming clock follows the project by default. In this mode, you can control the programming speed in a more fine-grained way, see Client Clock Settings of PowerWriter for details.
- High speed: set to 20Mhz.
- Medium speed: set to 10Mhz.
- Low speed: set to 5Mhz.
Data Display: Set the data display format of the burned page.
- Decimal
- Hexadecimal (default)
PWM signal: Set the waveform output of WCLR (PWM) pin, the maximum setting can be set to 120Mhz clock output, the minimum setting can be set to 1hz (0 means off output)
Display Brightness: Set the backlight brightness, the minimum is 5%, the brightest is 100%, and the step is 1%.
Screen saver time: Set the timeout for screen rest.
- 1 minute: Set to switch off the screen display after 1 minute.
- 5 minutes: Set to switch off the screen display after 5 minutes.
- 15 minutes: Set to switch off the screen display after 15 minutes.
- 60 minutes: Set to switch off the screen display after 60 minutes.
- Off (default): screen keep on.
Theme Style: Set UI Theme Color Mode
- Auto (default): Automatically determines the color scheme to be used based on the time of day it is switched on, using a light theme during the day and a dark theme at night.
- Dark : fixed use of dark themes.
- Light : Fixed use of light themes.
Language Setting: Set the interface display language.
- Simplified Chinese (default): Use Simplified Chinese language
- English: Use of the English language.
Log level: Setting the log filtering mode for offline programming
- Simple: only error messages are displayed.
- Detailed (default): displays the complete log message.
- Detailed (auto-store): displays the completed log message and automatically stores it in the burn log.
Device Authentication: Setting Device Lock Function
- On: boot up requires verification of the current device password before use
- Disable: boot automatically to the desktop
Screen Flip: Set the display mode of the screen, default is forward, can be set to reverse.
- Forward (default): defaults to forward display
- Reverse: Vertical flip display
Equipment self-test: Equipment is automatically tested for troubleshooting.
cautionEquipment self-test requires specific test peripherals to test, direct testing, will lead to the vast majority of test items do not pass.
System Storage: View current built-in storage usage information
cautionRestoring the factory settings will format the entire device, please proceed with caution.
Other settings:
- Overwrite files with the same name (default on): If the file name is the same when loading the project, the file with the same name will be overwritten, so as to avoid too many files, which will lead to difficulties in subsequent operations.
- Pop-up window when connecting (on by default): when connecting, other operations are prohibited, experimental function, please keep it off.
tipBy downloading orders through the cloud platform, there will be no files with the same name, and there is certainly no question of overwriting.
cautionThe pop-up window when connecting is only used when taking screenshots to record an animation, otherwise, please keep it closed.
Device Information: View device information.